How to back up your iOS device in five minutes via iCloud
How to back up your iOS device in five minutes via iCloud

If
you’ve invested in an iPhone, iPad, or iPod Touch, you probably keep
some very important information on your device that you won’t want to
lose. What would happen to your files, photos, and everything else on
your iOS device if it were lost, stolen, or severely damaged?
The
best way to safeguard your Apple mobile device is to back up your
data. With iOS, you have two simple options for backing up: Use iCloud
or use iTunes. This article explains how to back up using iCloud.
iCloud
is Apple’s own cloud-based storage and backup solution. It comes
included with your device, so it’s free to use (for up to 5GB worth of
data, as I’ll explain in more detail below). You should be able to
progress through the following instructions for backing up using iCloud
in about five minutes. Below the step-by-step instructions, you’ll
also find a quick overview of how to restore your device using iCloud,
should you need to. As well as that, I’ve included a list of things
that do get backed up using this method, along with a list of things
that don’t.
How to back up iPhone and iPad using iCloud
How to back up iPhone and iPad using iCloud
- Go to Settings > iCloud > Storage & Backup.
- Under Backup, turn on the switch for iCloud Backup.

- Go back one screen and turn on or off the data you want backed up from the selections. You’ll notice that not all your apps appear here, only the pre-installed Apple apps. At this stage, you can consider yourself finished with the backup if don’t want to back up anything else on your phone. If you’re finished, skip ahead to the final step in this section (“Connect your iPhone or iPad to a Wi-Fi signal”). If you do want to back up more of your non-Apple apps, continue through the rest of the following steps.

- Scroll all the way down to Storage & Backup, and tap it.
- Choose the third choice shown, Manage Storage.
- Under the heading Backups, select the entry for your phone. Mine is simply named “Jill’s Phone.” The resulting page may take a moment or two to load.
- You should now be on a page called Info. Under the heading Backup Options, you’ll see a list of the top five storage-using apps, plus another button labelled “Show All Apps.” Press Show All Apps, and you can now choose which items you want to back up. You should back up apps that contain important information or files, as well as apps that you have taken a lot of time to customise. I personally wouldn’t back up most apps that use a cloud service because all the app data you care about is already being hosted by the provider – not locally on your phone.

- As you decide which of your apps you don’t want to back up, toggle those to “off.” A red button reading “Turn Off & Delete” will appear. If you click it, you’ll still have the app and its data locally on your iPhone. All you’re “deleting” is the data from iCloud’s backup. At the bottom of the screen, you’ll see how much space you have available. Apple gives you 5GB of iCloud storage free. Of course, if you want to back up more, you can pay Apple for extra storage space, starting at £14 a year for an additional 10GB.
- Connect your iPhone or iPad to a Wi-Fi signal, plug it into a power outlet, and leave the screen locked (in other words, don’t use the device). Your iPhone or iPad will automatically backup once a day when it meets these three conditions. You can also manually initiate a backup to iCloud by connecting your iPhone or iPad to a Wi-Fi signal, and selecting Back Up Now under Settings > iCloud > Storage & Backup.
How to restore iPhone and iPad using iCloud
- When launching a new (or newly wiped) iOS device, a Setup Assistant will automatically ask if you want to “Restore from iCloud Backup.” Choose this option to restore your old iPhone or iPad’s data, apps and settings.
- Enter your iCloud username and password.
- You’ll see the three most recent backups to choose from. In most cases, you’ll want the latest one.
- From this point, the iPhone or iPad will pretty much do the rest. Enter passwords when prompted, and don’t mess with your phone while that progress bar is still doing its thing. iCloud will restore your apps to the version you had rather than the most up-to-date version, unless the previously stored version is no longer available, in which case it defaults to the most recent.
What will be backed up
- Music purchased through iTunes (but not in all countries).
- Apps.
- Books purchased through iTunes.
- Photos in the Camera Roll.
- Videos in the Camera Roll.
- Notes in the Notes app.
- Device settings (for example, Phone Favourites, Wallpaper, and Mail, Contacts, Calendar accounts).
- App data.
- Home screen and app organisation.
- Messages (iMessage, SMS, and MMS).
- Ringtones.
What won’t be backed up
- Media files synced from your computer aren’t backed up, but can be restored by syncing with iTunes.
- Apps, books, and music that have subsequently been removed from the App Store, iTunes Store, and iBookstore since you downloaded or purchased them
Nokia Lumia Serise USB Flashing Driver X64, X86
Nokia Lumia Flashing like WinUSB Drivers for Nokia Lumia Windows phone
520, 625, 620, 820, 720, 920, 925, 1020, 720, 900. The Flashing driver
for developer and Software repair, Update and Allow to you technical
operation method.
Download
WinUSB Drivers x86.rar 17.326 KB
WinUSB Drivers x64.rar 17.426 KB
Maintenance_v1.0.0.956_WinTest Xp/Win7/Win8 32/64 Bit Test Version !
Hi,
This is an test build meant to verify if the application runs properly on 64 bit version of Windows since some users experienced some problems before. Please test it hardly and let us know if works properly now.
Also
[x] We removed external dll dependency so please delete SYSTEM.dll
[x] We set up support to open in MS Internet Explorer from now on and made it smarter.
So again test all the functions available and let us know if any problems show up.
CLICK ME TO DOWNLOAD

SAMSUNG REX 70 (GT-S3802) User Lock Done By Z3X
1.Select Model S5222
2.Then Click User Code
3.1st Connect Phone Usb When Power On Phone Connect UART Cable.


2.Then Click User Code
3.1st Connect Phone Usb When Power On Phone Connect UART Cable.
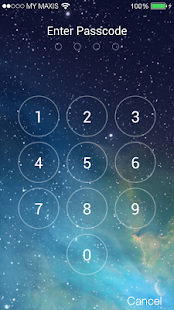
iOS7 Lockscreen for all Android Mobile Phone
Now you can enjoy iOS 7′s new parallax on your android lockscreen instead of waiting for the next iPhone!


Description
The first iOS 7 lockscreen with Parallax 3d effect! Prank your friend with your own iPhone. Support custom wallpaper too
*Latest Features* - Custom Wallpaper is now available!
*Latest Features* - More controls available on the control center!
*Dark Holo Theme* - Now the app are in dark holo theme! Looks much clean and nicer!
The FIRST iOS 7 Lockscreen with Parallax effect!
Now you can enjoy iOS 7's new parallax on your android lockscreen instead of waiting for the next iPhone!
*Update - New Wallpaper* 2 new wallpapers available!
*Fixes - Improved Performance
*Note* On some devices the home button might response slow. But it will lock back your phone after a few seconds.
★ Set pin to enhance your phone security
★ Launch app from lockscreen
★ iOS 7 wallpaper available for selection!
★ Simulate the best iOS 7 Lockscreen.
★ Best View on HD Android Phone.
★ Built specially for lockscreen. Consume less memory and battery.
Playstore link
Or
DOWNLOAD APK
Mvs android tool v3.0
mvs android tool v3.0
here screeshot

cheak device in normalmode
cheak device in fastboot mode
enter to download mode
enter to fastboot mode
enter to recovery mode
flash updte.zip in fastboot mode(some models not support)
flash data.img in fastboot mode
flash recovery.img in fastboot mode
flash cache.img in fastboot mode
flash boot.img in fastboot mode
htc detailes
htc cid detailes
htc read cid
htc write cid
htc write super cid
htc goldcard creating
all htc opration in fastboote mode
next version
mvs android tool v4.0
adding in samsung unlock without data lose
heartly thanks to
sureshraaja007
vinugsm
here download link
here screeshot
cheak device in normalmode
cheak device in fastboot mode
enter to download mode
enter to fastboot mode
enter to recovery mode
flash updte.zip in fastboot mode(some models not support)
flash data.img in fastboot mode
flash recovery.img in fastboot mode
flash cache.img in fastboot mode
flash boot.img in fastboot mode
htc detailes
htc cid detailes
htc read cid
htc write cid
htc write super cid
htc goldcard creating
all htc opration in fastboote mode
next version
mvs android tool v4.0
adding in samsung unlock without data lose
heartly thanks to
sureshraaja007
vinugsm
here download link
Miracle GSM Cocktail - BlackBerry Tool 1.5.4
MIRACLE GSM COCKTAIL
NEW GENERATION TOOL FOR HTC, ANDROID & BLACKBERRY
Wednesday - 2013 09 October
iNNOVATED BY MIRACLE TEAM
Miracle GSM Cocktail
BlackBerry Tool 1.5.4
Wednesday - 2013 09 October
iNNOVATED BY MIRACLE TEAM
Miracle GSM Cocktail
BlackBerry Tool 1.5.4
Whats New:
Added new MEPs:
MEP-46977-002
MEP-46977-004
MEP-46990-002
MEP-46990-004
Added 9320 for Easy Flashing
Added 9220 for Easy Flashing
Updated Easy Packges(9100,9000,9220,9300,9320,9380,9500,9520,97 00,9780,9790,9800)
Fixed flash procedure
Updated MEP <> PRD Calculator
AddedNew Files on Server
ACCESS TO SUPPORT AREA:
www.gsmcocktail.com/support/
Always use Shell to download all updates and all setups.
Always use last versions.
Always Install all setups in one drive.
Always use last versions.
Always Install all setups in one drive.
WE ALWAYS CARE OUR USER
ALWAYS GIVING ╭╮SHOCK TO OTHER
(:::::::::::::::::[MIRACLE TEAM ]:::::::::::::::::)
(:::::::::::::::::[MIRACLE TEAM ]:::::::::::::::::)
GSM COCKTAIL
Innovated by Miracle Team
www.gsmcocktail.com
HTC 2013 UNLOCK READY!!!
FUTURE WORK:
HUWAEI UNLOCK ON THE WAY
DOWNLOAD LATEST SHELL 1.2.9
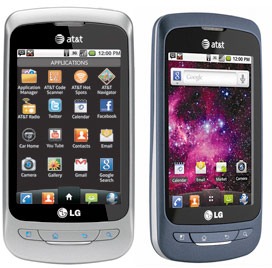
LG Thrive Hard Reset, Wipe Data to Factory Default Settings
Here's a step by step instructions on how to hard reset the LG Thrive (for AT&T mobile USA).
2G Network GSM 850 / 900 / 1800 / 1900
3G Network HSDPA
OS Android OS, v2.2 (Froyo)
CPU 600 MHz ARM 11 processor, Adreno 200 GPU, Qualcomm MSM7227 chipset
2G Network GSM 850 / 900 / 1800 / 1900
3G Network HSDPA
OS Android OS, v2.2 (Froyo)
CPU 600 MHz ARM 11 processor, Adreno 200 GPU, Qualcomm MSM7227 chipset
Precautions: Performing hard reset process will delete or wipe all data from the. We highly recommend to have a back up copy of all your important files stored on the device.
LG Thrive Factory Data Reset procedures:
1. On the main home screen, tap menu
2. Select Settings, then Privacy
3. Select Factory data reset
4. Select Reset phone
5. Enter the password if prompted, then select Erase everything.
If the LG Thrive is frozen: Reboot or restart the phone and do a hard reset through button combination.
1. Turn the power off. , take the battery out and reinsert it back again
2. Hold the Volume Down and Power Button
3. A menu will then show up such as Fastbook, Recovery, Clear Storage, and Simlock
4. Select Clear Storage by pressing the Volume Down button
5. Press and release the Power button
6. Select: Volume Up for YES and Volume Down for NO
Wait 'till the phone reboot, once the wipe process completes, the LG Thrive will return to its original factory fresh state default settings.
All data including third-party applications will be deleted from the LG Thrive . You may need to re-install it back again.
__________________
Samsung DROID Charge Hard Reset, Wipe and Restore to Factory Settings
Here's a step by step instructions on how to
hard reset the Samsung DROID Charge.Also known as Samsung SCH-i520,
Samsung Inspiration, Samsung 4G LTE, Samsung Stealth V
OS Android OS, v2.2 (Froyo)
CPU 1 GHz ARM Cortex-A8 processor, Hummingbird chipset

OS Android OS, v2.2 (Froyo)
CPU 1 GHz ARM Cortex-A8 processor, Hummingbird chipset
Precautions: This process will delete or wipe all data from the Samsung DROID Charge. We advise to have a back up copy of all your important files stored on the device.
Factory Data Reset procedures:
1. On the main home screen, tap menu
2. Select Settings, then Privacy
3. Select Factory data reset
4. Select Reset phone
5. Enter the password if prompted, then select Erase everything.
If your Samsung DROID Charge is frozen: Reboot or restart the phone.
1. Turn the power off. , take the battery out and reinsert it back again
2. Hold the Volume Down and Power Button
3. A menu will then show up such as Fastbook, Recovery, Clear Storage, and Simlock
4. Select Clear Storage by pressing the Volume Down button
5. Press and release the Power button
6. Select: Volume Up for YES and Volume Down for NO
Wait 'till the phone reboot, once the wipe process completes, the Samsung DROID Charge will return to its original factory fresh state default settings.
All data including third-party applications will be deleted from the Samsung DROID Charge.So you may need to re-install it back again.
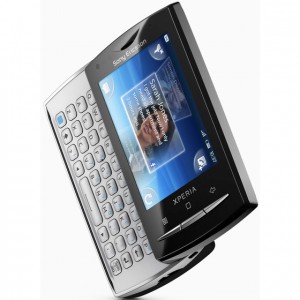
Fix Hang/Frozen Problem for Sony Ericsson Xperia X10 mini Pro, Hard Reset
This a simple guide on how to hard reset Sony
Ericsson Xperia and restore the device to its original factory default
settings. This may also help to fix the said android smartphone if
suffered severe hang or freezing problems. This may work on Sony
Ericsson Xperia Mini, Mini Pro, X10 Mini and X10 Mini PRO.
Note: A hard reset process will wipe or delete the data stored on the device, so make sure to back of all important files you've installed or stored on the phones memory. However, this may not harm the files stored on the microSD memory card.
Factory Reset by Settings:
This can be done from Main Home Screen
then select SETTINGS, then PRIVACY
select FACTORY DATA RESET and then RESET PHONE
then choose ERASE EVERYTHING
This will wipe the present settings and then restore back the device to its factory settings.
If your Xperia X10 Mini or mini Pro experienced Hang or Freezing problem.
Sometimes you may just stuck on the start up logo, this may help if you can't access or get through to the home screen. If this happens you may reboot the phone by way of pressing button combination and do a hard reset.
- Turn the power off or remove the battery out and reinsert it back again.
- Hold the Left and right buttons found beneath the LCD display
- Briefly Press and release the Power button
- Follow the steps on-screen to hard reset your phone
If somehow if the hard reset will not fix hang or frozen problem, the only and final option is to restore or flash the phone's original stock ROM or firmware.
HTC EVO 3D Hard Reset Procedure
This are the procedures to soft/hard reset the HTC EVO 3D to its original factory default settings.

Note:
Performing a factory reset is only advisable if you want to return
back the phone to its original factory default settings and also fix
some abnormal functions of the device. We recommend to have a back up
copy all of your personal data before proceeding because the result
of this process will delete all data you previously installed on
the device. HTC EVO 3D Factory data reset:
1. On the main home screen, select menu
2. Select Settings, then Privacy
3. Select Factory data reset
4. Select Reset phone
5. Enter the password if prompted, then confirm by selecting Erase everything
HTC EVO 3D Hard reset, this may help if the phone experience some hang or frozen on some applications:
1. Turn the phone's power off. Take the battery out from the device, wait a couple of seconds and reinsert it back again.
2. Gently, Press and Hold the Volume Down button
3. Then also press and hold the Power button until the device turns on
4. A menu will then appear like: Fastbook, Recovery, Clear Storage, and Simlock
5. Just select Clear Storage by pressing the Volume Down button
6. Then press and release the Power button
7. Select Volume Up if YES and Volume Down for NO
The phone will then reboot to its factory fresh state settings, once the reset process is completes.
Any data including third-party applications previously stored from the HTC EVO 3D already wiped or deleted.
HTC Wildfire S Soft/Hard Reset, Format to Factory Settings
Note: Performing a hard reset will permanently
delete all your data and customized settings, any applications you've
downloaded and installed on your HTC Wildfire S will also remove .
factory reset will not delete the data and files that are stored in your phone’s microSD card.Be sure to back up any data and files you want to keep before you do a factory reset.
Restarting your HTC Wildfire S phone (soft reset)
If the phone is runs slower than normal, an application is not performing properly, or your phone becomes unresponsive, just try restarting your phone and see if that helps solve the problem.
To restart your phone, simply turn it off and back on. If pressing and holding the POWER button doesn't work, then remove the battery, wait for a few seconds, reinsert the battery, and then turn the phone on.
HTC Wildfire S - Factory reset via settings
1. From the Home screen, press MENU
2. Select Settings.
3. Scroll down the screen and
4. Then tap Privacy, select Factory data reset.
5. On the Factory data reset screen, tap Reset phone.
6. Then select Erase everything.
HTC Wildfire S- Performing a factory reset using phone button combination.
If you cannot turn on your phone or access the phone settings, you can still perform a factory reset by using the buttons on the phone.
1. With the HTC Wildfire S phone turned off, press and hold the VOLUME DOWN button, and then briefly press the POWER button.
Note: If you are not sure whether your phone's power is turned off, remove and then reinsert the battery.
2. Wait for the screen with the three Android images to appear, and then release the VOLUME DOWN button.
3. Press VOLUME DOWN to select CLEAR STORAGE, and then press POWER.
4. Press VOLUME UP to start the factory reset.
__________________
HTC Desire S Hard Reset, Format to Factory Default Settings
HTC Desire S Hard Reset, Format to Factory Default Settings
Restarting your HTC Desire S phone (soft reset)
If the phone is runs slower than normal, an application is not performing properly, or your phone becomes unresponsive, just try restarting your phone and see if that helps solve the problem.
To restart your phone, simply turn it off and back on. If pressing and holding the POWER button doesn't work, then remove the battery, wait for a few seconds, reinsert the battery, and then turn the phone on.
HTC Desire S - Factory reset via settings
1. From the Home screen, press MENU
2. Select Settings.
3. Scroll down the screen and
4. Then tap Privacy, select Factory data reset.
5. On the Factory data reset screen, tap Reset phone.
6. Then select Erase everything.
HTC Desire S- Performing a factory reset using phone button combination.
If you cannot turn on your phone or access the phone settings, you can still perform a factory reset by using the buttons on the phone.
1. With the HTC Desire S phone turned off, press and hold the VOLUME DOWN button, and then briefly press the POWER button.
Note: If you are not sure whether your phone's power is turned off, remove and then reinsert the battery.
2. Wait for the screen with the three Android images to appear, and then release the VOLUME DOWN button.
3. Press VOLUME DOWN to select CLEAR STORAGE, and then press POWER.
4. Press VOLUME UP to start the factory reset.
Note: Performing a hard reset will permanently
delete all your data and customized settings, any applications you've
downloaded and installed on your HTC Desire S will also wipe .
factory reset will not delete the data and files that are stored in your phone’s microSD card. Just ensure to back up any data and files you want to keep before you may proceed to a factory reset.
This is a step by step instruction on how to Factory Reset and Hard Reset the HTC Desire S from HTC support.
Restarting your HTC Desire S phone (soft reset)
If the phone is runs slower than normal, an application is not performing properly, or your phone becomes unresponsive, just try restarting your phone and see if that helps solve the problem.
To restart your phone, simply turn it off and back on. If pressing and holding the POWER button doesn't work, then remove the battery, wait for a few seconds, reinsert the battery, and then turn the phone on.
HTC Desire S - Factory reset via settings
1. From the Home screen, press MENU
2. Select Settings.
3. Scroll down the screen and
4. Then tap Privacy, select Factory data reset.
5. On the Factory data reset screen, tap Reset phone.
6. Then select Erase everything.
HTC Desire S- Performing a factory reset using phone button combination.
If you cannot turn on your phone or access the phone settings, you can still perform a factory reset by using the buttons on the phone.
1. With the HTC Desire S phone turned off, press and hold the VOLUME DOWN button, and then briefly press the POWER button.
Note: If you are not sure whether your phone's power is turned off, remove and then reinsert the battery.
2. Wait for the screen with the three Android images to appear, and then release the VOLUME DOWN button.
3. Press VOLUME DOWN to select CLEAR STORAGE, and then press POWER.
4. Press VOLUME UP to start the factory reset.
__________________
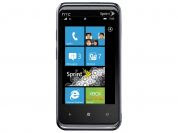
HTC Arrive Hard Reset, Format Factory Settings
The HTC ARRIVE is the first Sprint smartphone powered by Microsoft's Windows Phone 7.
Performing a hard reset may help if you want or decide to sell your HTC Arrive and buy a new device?This process will restore the phone to its original factory state default settings
your Arrive will be restored to a like-new state with all of your files and personal information cleared from memory.

This is a simple instruction on how to hard reset your HTC Arrive:
1. From the home screen, swipe left to expose your app list
2. Tap Settings
3. Scroll down and tap about
4. Tap reset your phone
5. Tap yes to confirm, then tap yes to confirm again
Once the reset process completes, It will then reboot and you'll be left with a factory fresh phone.
T-Mobile LG G2X Hard Reset
Here's the procedure on how to hard reset the LG G2x to clear all data and restore its original settings.
Be aware that the result of this process will delete all the data stored on the device.. We recommend to make a back up copy of all your personal data before proceeding. Performing a hard reset is only advisable if the phone experience several error problems like frozen or unresponsive.

Be aware that the result of this process will delete all the data stored on the device.. We recommend to make a back up copy of all your personal data before proceeding. Performing a hard reset is only advisable if the phone experience several error problems like frozen or unresponsive.

Here's how to factory reset the phone safely, you may try this first.
1. From the home screen, select Menu
2. Select Settings,
3. Select Privacy
4. Select Factory data reset
5. Select Reset phone
6. Enter the password if prompted,
7. Then confirm by selecting Erase everything
Hard reset the LG G2x - this may help if the phone is frozen but this will delete all data you previously installed on the device.
1. Turn OFF the phone's power then take the battery out from the device and reinsert it back again.
2. Hold the Volume Down button
3. Briefly press and hold the Power button until the phone turns on
4. A menu appears: Fastbook, Recovery, Clear Storage, and Simlock
5. Just select Clear Storage by pressing the Volume Down button
6. Press and release the Power button
7. Select Volume Up for YES and Volume Down for NO
Wait 'till the phone completely reboot..
All data including 3rd-party applications you installed on your LG G2X already wipe out. You need to re-install it back again. Enjoy!
Apple iPad 2 Factory Reset Contents and Settings Instruction
Some expected pure gold: a tablet that runs as fast as a laptop and weighs less than a newspaper.
Yet, the reality with the iPad 2 is that Apple has taken an iterative approach. In many ways, the iPad 2 is a crowd pleaser because it does not rock the boat.
Yet, the reality with the iPad 2 is that Apple has taken an iterative approach. In many ways, the iPad 2 is a crowd pleaser because it does not rock the boat.

After installing and removing many apps, your iPad 2 might start acting up, and unexpected errors may occured.
Dont' worry, here's how to factory reset the Apple iPAD 2
1. On your iPad 2 home screen, tap the Settings icon
2. Tap General in the menu to the left of the screen, then tap Reset
3. Here, you will have two options:
1. "Reset All Settings" will restore all of your app settings to their original status
2. "Erase All Content and Settings" will reset all app settings and erase all of your data (photos, apps, bookmarks, music, etc.)
4. After selecting one of the two options above, your iPad 2 will reboot
5. If you selected "Erase All Content and Settings", you will need to reconnect your iPad 2 to iTunes in order to reactivate it
Infinity-Box Nokia [BEST] v1.73 - more Lumia features and other
Infinity-Box Nokia [BEST] v1.73 released
- USB flashing improved
- WP7x : Added "Reset EFS" enable/disable option
It make EFS restore after flashing (Reset SimLock (RELOCK), Counter)
- Service operations improved
- Lumia WP7x SimLock info (Lock state/Operator) released
- Asha OS LifeTimed Read/Reset/Edit released
- XG223 RPL operations improved: Factory RPL/Backup mode handling. Require to write RPL from "dead" mode
- XG213 RPL operations improved
- User Data operations improved
- SMS extraction for Lumia WP7x released (from image)
- Phonebook extraction for Lumia WP7x released (from image)
Extraction is under test and remote for now (take some time)
- Navi Updated
Added latest firmwares for Asha and Lumia phones
- Other
- Ini updated
- Stuff Files updated
- Some bug fixes at all
Direct download link: http://www.infinity-best.com/downloa...BEST_v1.73.rar
[ROM][CUSTOM MIUI]MIUI V5 For Xolo Q1000 V 3.10.4 Latest UDATED
MIUI For XOLO Q1000

NEW MIUI VERSION 3.10.4
Quote:
ScreenShots
Quote:
|
|
|
|
|
|
|
|
|
|
|
|
|
|
|
|
|
|
|
|
|
|
|
|
|
|
|
|
|
|
Quote:
        |
Download Link
Quote:
Quote:
|
Flashing Instructions
Quote:
Quote:
|
Bugs
Quote:
NONE
U may report if found
U may report if found
Irkey v4.2.8 HTC ONE 801e-HTC J ONE-HTC One SV-HTC Sensation XL Much More On The Way
"IR-Key Suit" version 4.2.8 Released
Added:
HTC ONE 801e (M7): Direct Unlock, SuperCID, S-OFF, S-ON, Reset Tamper Flag, Relock
HTC J ONE (DLX_WLJ): Direct Unlock, SuperCID, S-OFF, S-ON, Reset Tamper Flag, Relock
HTC One SV 520 (K2_U, K2_UL, K2PLC_LC): SuperCID, S-OFF, Change IMEI, Change CID, Remove Red txt
HTC ONE S (Ville) : Read Unlock Code, CID List
HTC Sensation XL (Runnymade): Change CID, Change IMEI, SuperCID, CID List
Soffbin3 Root
CID List is Complete
For all these things, phone must be rooted Or connected in recovery (custom recovery) mode.

How to download ?
1- Download Main Setup from here
2- open Irkey 4.0 Software
3- Click on Update
4- click on Update Ir-key
5- Wait software will check server for updates
6- tick all files and click download
7- click on update
8- Restart software and you are ready
Previous Update !!
Added:
Htc One S (Ville) Imei Repair and Change directly. (phone must be rooted, or is connected in recovery mode.)
Htc One S (Ville) Change CID directly. (phone must be rooted, or is connected in recovery mode.)
Direct rename ROM to install the Hboot.
Unlock,Pattern، Gmail, personal code, with two new methods.
Fixing bugs:
"Ville Module: Adding Change imei + bug fixes"
"Tools Module: Adding Quick Format in Diag + bug fixes"
"China Androids: Adding 2 Unlock Methods, Fix Permisions, Check Root"
"Androids : Adding 2 Unlock Methods, Fix Permisions, Zip File Name Fixer(Hboot), Copy Get Rom Info to Clipboard"
"FTP Navigator: Fixing RunTime Error. Disabling External an Rom option temporary."
Showing version and Copy + bug Fixes."
Buy Online
GSMSP | IR-Key
Resellers Which have IN STOCK !!
WorldWide
GPGIndustries
Pakistan
Iqbal communication
Orange Mobiles
INDIA
MOBILECLINIC
HongKong
GSMSERVER
Ukraine
GSMSERVER
POLAND
MULTICOM
United Kingdom
FONEFUNSHOP
France
GSMBOUTIQUE
HONDURAS
DeMPaFi El OɹıƃıBnɐʎ
Other Resellers Will have Soon...
Make Order to your Nearest GPGIndustries Reseller !!
Added:
HTC ONE 801e (M7): Direct Unlock, SuperCID, S-OFF, S-ON, Reset Tamper Flag, Relock
HTC J ONE (DLX_WLJ): Direct Unlock, SuperCID, S-OFF, S-ON, Reset Tamper Flag, Relock
HTC One SV 520 (K2_U, K2_UL, K2PLC_LC): SuperCID, S-OFF, Change IMEI, Change CID, Remove Red txt
HTC ONE S (Ville) : Read Unlock Code, CID List
HTC Sensation XL (Runnymade): Change CID, Change IMEI, SuperCID, CID List
Soffbin3 Root
CID List is Complete
For all these things, phone must be rooted Or connected in recovery (custom recovery) mode.
How to download ?
1- Download Main Setup from here
2- open Irkey 4.0 Software
3- Click on Update
4- click on Update Ir-key
5- Wait software will check server for updates
6- tick all files and click download
7- click on update
8- Restart software and you are ready
Previous Update !!
Added:
Htc One S (Ville) Imei Repair and Change directly. (phone must be rooted, or is connected in recovery mode.)
Htc One S (Ville) Change CID directly. (phone must be rooted, or is connected in recovery mode.)
Direct rename ROM to install the Hboot.
Unlock,Pattern، Gmail, personal code, with two new methods.
Fixing bugs:
"Ville Module: Adding Change imei + bug fixes"
"Tools Module: Adding Quick Format in Diag + bug fixes"
"China Androids: Adding 2 Unlock Methods, Fix Permisions, Check Root"
"Androids : Adding 2 Unlock Methods, Fix Permisions, Zip File Name Fixer(Hboot), Copy Get Rom Info to Clipboard"
"FTP Navigator: Fixing RunTime Error. Disabling External an Rom option temporary."
Showing version and Copy + bug Fixes."
Buy Online
GSMSP | IR-Key
Resellers Which have IN STOCK !!
WorldWide
GPGIndustries
Pakistan
Iqbal communication
Orange Mobiles
INDIA
MOBILECLINIC
HongKong
GSMSERVER
Ukraine
GSMSERVER
POLAND
MULTICOM
United Kingdom
FONEFUNSHOP
France
GSMBOUTIQUE
HONDURAS
DeMPaFi El OɹıƃıBnɐʎ
Other Resellers Will have Soon...
Make Order to your Nearest GPGIndustries Reseller !!
How To Hard Reset Galaxy Note 3
Samsung Galaxy Note 3 SM-N900 Hard Reset Steps:
- Take out your phone's battery, SIM-card and memory card too.
- Take out your phone's battery, SIM-card and memory card too.
- After 10 seconds put the battery back into your phone.
- Press and hold Volume Up key + Home key then press Power key.
- Keep pressing the above keys until Samsung logo appears,Then release Power key only.
- When you see Android Green man release all keys.
- You will get Factory reset / System Recovery menu on screen.
- Use Volume Down key to select Wipe Data / Factory Reset option.
- Use Power key to confirm the operation.
- You need to use the Volume Down key again to select "Yes -- delete all user data"
- Use Power key to confirm.
- After performing the hard reset, Select Reboot System Now option, And confirm it using Power key.
- Now the phone will reboots, Wait for it to be fully on and then you can start using it.
Samsung Tool 15.9 Update. Just for warm UP
- support GT-N8000 (direct unlock,read codes, imei repair, read/write EFS, flashing)
- support GT-N8010 (direct unlock,read codes, imei repair, read/write EFS, flashing)
- support GT-I5510M (direct unlock,read codes, imei repair, flashing)
- support GT-I5510L (direct unlock,read codes, imei repair, flashing)
- support GT-I5510T (direct unlock,read codes, imei repair, flashing)
- support GT-I9195L (SAFE Direct Unlock & SAFE OneClick Imei repair, flashing)
- support GT-I9195T (SAFE Direct Unlock & SAFE OneClick Imei repair, flashing)
- support GT-I9197 (SAFE Direct Unlock & SAFE OneClick Imei repair, flashing)
Fixed:
- root detecting android phones
- s3570, s3572, c3260, c3262 direct unlock,codereading.
p.s. just for warm UP. May be before tornado )
)
Directlink
- support GT-N8010 (direct unlock,read codes, imei repair, read/write EFS, flashing)
- support GT-I5510M (direct unlock,read codes, imei repair, flashing)
- support GT-I5510L (direct unlock,read codes, imei repair, flashing)
- support GT-I5510T (direct unlock,read codes, imei repair, flashing)
- support GT-I9195L (SAFE Direct Unlock & SAFE OneClick Imei repair, flashing)
- support GT-I9195T (SAFE Direct Unlock & SAFE OneClick Imei repair, flashing)
- support GT-I9197 (SAFE Direct Unlock & SAFE OneClick Imei repair, flashing)
Fixed:
- root detecting android phones
- s3570, s3572, c3260, c3262 direct unlock,codereading.
p.s. just for warm UP. May be before tornado
)Directlink
samsung ( M110S ) Galaxy S Too many Patterns done via hard reset
samsung ( M110S ) Galaxy S
PROBLEM: SECURITY CODE

ACTION: HARD RESET ONLY
PROCEDURE:
Quote:
|
1=.hold key volume + home center key + power on 2= after show bootmode press down volume and select factory reset 3= press center ok and wait until done 4= press center button to restart mobile after reboot |


done

Samsung s3770k imei repair done with simple trick
Samsung s3770k imei repair done with simple trick just select model s5610 in model list use 3303k rj45 cable and do repair
here is log"s
Selected model: S5610
Selected com port: COM33
Selected speed port: 921600
Please, connect phone and press power button 3 seconds
Phone Detected
Phone in TAT MODE
Phone Old IMEI: 00000000000000
Phone SW: S3770KDDLH1
Phone BT ADDR: 0012-47-000001
Phone SN: 0000000000
Phone NEW IMEI: 35872404224530
Repair - ok
Elapsed time: 12 second, sw ver: 3.5.0037
Hyper-Box 4.30 Released Discussion
Hyper-Box 4.30 Released
Spreadtrum News:
Add SC6803 CPU Support
Add SC6800H\6803 CPU Support COM Boots
Read Flash\Write Flash\Read Info\IMEI Repair
SC6800H\6803 CPU Support Format
* SC6800H\6803 Support Com Boot *
Mstar News:
Fix Mstar 853XB CPU Bugs
Fix Mstar NAND Flash Bugs
Tip: You Must Upgrade You Box Firmware to 1.62 !!!
Download Link
MediaFire link here download link
NCK Dongle Shell 0.3 Released [30/09/2013]
NCK Team is Happy to Present NCK Dongle Shell 0.3
As our users already know how to use this Shell, we have introduced more features for our valuable users.

Whats New?
- Added function to download updated Database from server without installing new version.
- Added function to check for missing files in current installation and download from server without need of downloading whole installer.
- Can Install complete NCK Dongle Modules without downloading installers. But we recommend using installers, at least for the first time.
How To Use:
- To install package or missing files, simply go to Updater page of Shell.
- Click on Check Files to let Shell check if your current installation is latest.
- It will show you complete list of files, and their status ( OK or Need Update ).
- If any file needs to be updated, you can click on Update button and your files will be updated accordingly.
- To Update Shell Database, simply click on Update DB.
- Shell will download and install update and will close.
- Simply run again and you will have latest Database.
Any suggestions regarding shell options are welcome. You can also report here any missing model not listed in Shell.
Any off topic post will be deleted.
Download
As our users already know how to use this Shell, we have introduced more features for our valuable users.
Whats New?
- Added function to download updated Database from server without installing new version.
- Added function to check for missing files in current installation and download from server without need of downloading whole installer.
- Can Install complete NCK Dongle Modules without downloading installers. But we recommend using installers, at least for the first time.
How To Use:
- To install package or missing files, simply go to Updater page of Shell.
- Click on Check Files to let Shell check if your current installation is latest.
- It will show you complete list of files, and their status ( OK or Need Update ).
- If any file needs to be updated, you can click on Update button and your files will be updated accordingly.
- To Update Shell Database, simply click on Update DB.
- Shell will download and install update and will close.
- Simply run again and you will have latest Database.
Any suggestions regarding shell options are welcome. You can also report here any missing model not listed in Shell.
Any off topic post will be deleted.
Download
Samsung Galaxy S3 [GT-I9300]Direct Unlock Done! Insurance Easy & Hassle SmartSamBox
Samsung Galaxy S3 [GT-I9300]Direct Unlock Done!
Insurance Easy & Hassle SmartSamBox

Insurance Easy & Hassle SmartSamBox
Quote:
Checking ADB interface... done
Reading phone info:
Model: GT-I9300
Product Code: GT-I9300MBLCOM
SW Ver: I9300UBELL1
Build PDA: I9300UBELL6
CSC Ver: I9300COMEMA1
HW Ver: MP 1.100
RFCAL Date: 2012.6.13
Version Release: 4.1.2
Checking rights... ROOT
Reading NV data file... done
Unlocking NV data file... done
Writing NV data file... done
Rebooting...
Unlock done sucess
Operation done, duration: 6s
Samsung S8600 WAVE3 Successfully Flash Done
Samsung S8600 WAVE3 Successfully Flash Done
Samsung S8600Multiloader_V5.67
Samsung S8600 Tested File XXKJC
File Password -****************
Just Select This File :
Samsung S8600Multiloader_V5.67
Samsung S8600 Tested File XXKJC
File Password -****************
Just Select This File :
- BOOTFILES
- amms.bin
- apps_compressed.bin
- Rsrc1 Rsrc_S8600_Open_Europe_Common.rc1
- Rsrc2_S8600(Low).rc2
- Factory FS et sélectionnez
- FactoryFs_S8600_Open_Europe_Common.ffs
- ShpApp.app
- CSC_S8600_Open_Europe_Common_OXA.csc
- bplib_S8600OpEuroCommon.fota
- dsp1.bin
Here Screenshot


VolcanoBox 2.3.4 Advanced Engineered Multi-Droid Tool - Lot of New FastBoot Options
!! Most Advanced Engineered Ultimate Multi-Droid Tool !!
!! No Restrictions of Brand name !!
VolcanoBox 2.3.4 Whats hot ?
ADDED FASTBOOT Mode Flashing
ADDED FASTBOOT Mode Cache Flashing
ADDED FASTBOOT Mode Data Flashing
ADDED FASTBOOT Mode Boot Flashing
ADDED FASTBOOT Mode Recovery Flashing
ADDED FASTBOOT Mode System Flashing
ADDED FASTBOOT Mode Update.zip Updating
ADDED FASTBOOT Mode HTC GET MID
ADDED FASTBOOT Mode HTC GET CID
ADDED FASTBOOT Mode HTC OEM CID
ADDED FASTBOOT Mode HTC Write Super CID
ADDED FASTBOOT Mode HTC Get Identity
ADDED FASTBOOT Mode Coming Soon
Still need any other Android Tool ?
SUPPORT US !! & tell your friends how good is volcano... We need more sales to invest more in R&D & We Really Need it !!!!!
Hotfile
MediaFire
Subscribe to:
Comments (Atom)
